Downloading Files from the Inbox
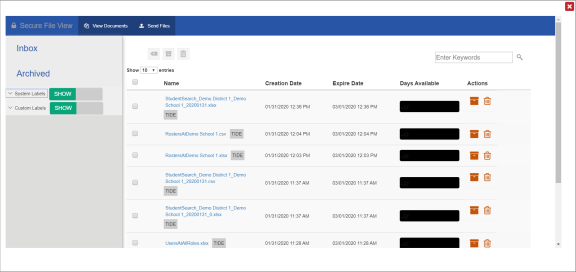
When searching for users, students, and students' test settings, you can choose to export the search results to the Inbox. The shared Inbox (see Figure 5) serves as a secure repository that lists files containing the data that you have exported in TIDE and other CAI systems. When you choose to export search results to the Inbox, TIDE sends you an email to your email address that is registered in TIDE when the export task is completed and the file is available in the Inbox for download.
The Inbox also lists any secure documents that have been externally uploaded to the Inbox and that you have privileges to view.
- The files in the Inbox are listed in the order in which they were created. The file creation and file expiration dates appear, if applicable.
- The number of days remaining until a file expires is also displayed next to a file. By default, exported files are available for 30 days while secure documents are available for the period specified.
- You can access the Inbox from any page in TIDE to either download or archive files for future reference. You can also delete the files you have exported, provided you have not archived them.
To access files in the Inbox:
1.From the TIDE banner (see Figure 4), select Inbox. The Inbox page appears. By default, TIDE displays the View Documents tab.
Figure 5: Inbox

2.Optional: Select the file view from the available tabs:
-
Inbox: This is the default view and displays all the files except for the ones that you have archived.
-
Archived: Displays the files that you have archived.
3.Optional: To filter the files by keyword, enter a search term in the search field above the list of files and click  . The list is filtered to display only those files containing the entered file name.
4.Optional: To hide or display system or custom labels, toggle  /
/ .
.
5.Optional: To hide files with a system or custom label, unmark the checkbox for that label.
6.Do one of the following:
- To download a file, click the file name.
- To add a new custom label or apply an existing custom label, select
 .
.- To apply a new custom label, mark the checkbox, enter a new custom label in the text box, and select Save New Label.
- To apply an existing custom label, mark the checkbox, enter an existing custom label in the text box, and select Apply Label.
- To archive a file, click
 .
.
- To delete a file, click
 .
.
Note: About File Deletion - Archived files cannot be deleted.
- You can delete files that you have exported, but you cannot delete secure documents uploaded to the Inbox by admin users.


 /
/ .
. .
. .
. .
.