Search for Records
Many tasks in TIDE require you to retrieve a record or group of records (for example, locating a set of students to work with in the Manage Students task). For such tasks, sections appear in the search area when you first access the task page (Figure 9). The following explains how to use the search sections.

New: The
To search for records:
1.If you're a corporation-level user, you'll need to make a selection at the school level. You can select all schools, though, on most search functions. However, this is not available for all searches.
2.In the search sections, enter search terms and select values from the available search dropdowns, as required. Required search options are marked with an asterisk. Some options may allow you to select multiple values or limit selections as you enter search terms.
Note: The search options available in the search sections depend on the record type.
3.Optional: If the task page includes an Advanced Search section, you can select values to further limit the search results:
a.To include an optional search criterion, choose one and then select Add Selected. Once you've added the option, select a value to search for, if needed or required.
b.Optional: To delete an additional search criterion, select Remove beside the option to remove it. You can also delete all criteria by selecting Remove All.
Note: For information about how TIDE evaluates additional search criteria, you can review Evaluate Advanced Search Criteria.
4. Select Search.
5.The search results pop-up window (Figure 10) indicates the number of records that matched your search criteria. It also displays options to view the records, export the records, or modify your search.
Figure 10: Sample Search Results Pop-up Window
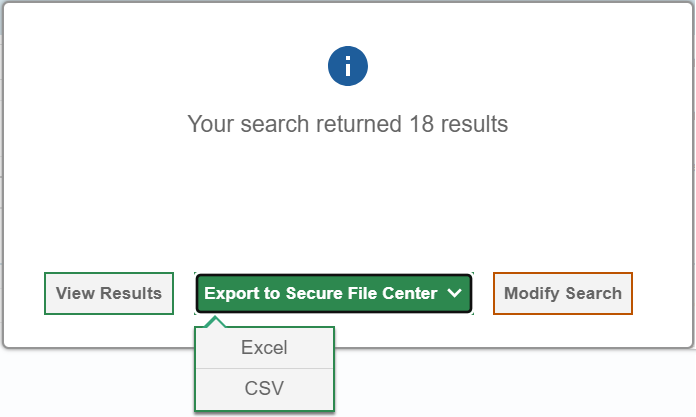
6.To view the retrieved records on the page within TIDE, select View Results. The list of retrieved records appears below the collapsed search sections.
Note: This option is not available if TIDE detects that loading too many records might adversely affect its performance.
7.To export the retrieved results to the Secure File Center, select Export to Secure File Center and pick the file format for the export.
While your file is being exported, you can navigate away from the page and perform other tasks, if desired.
When your file is available for download, you will receive a notification via the email account that is associated with your user account in TIDE.
After receiving the email, the exported file is available for download from the Secure File Center. (For more information, you can review: Download Files from the Secure File Center)
- Alert: Files are not emailed. This helps to maintain the security of the information.
8.To change your search criteria, select Modify Search.