Rendering Paper-Based Interactions
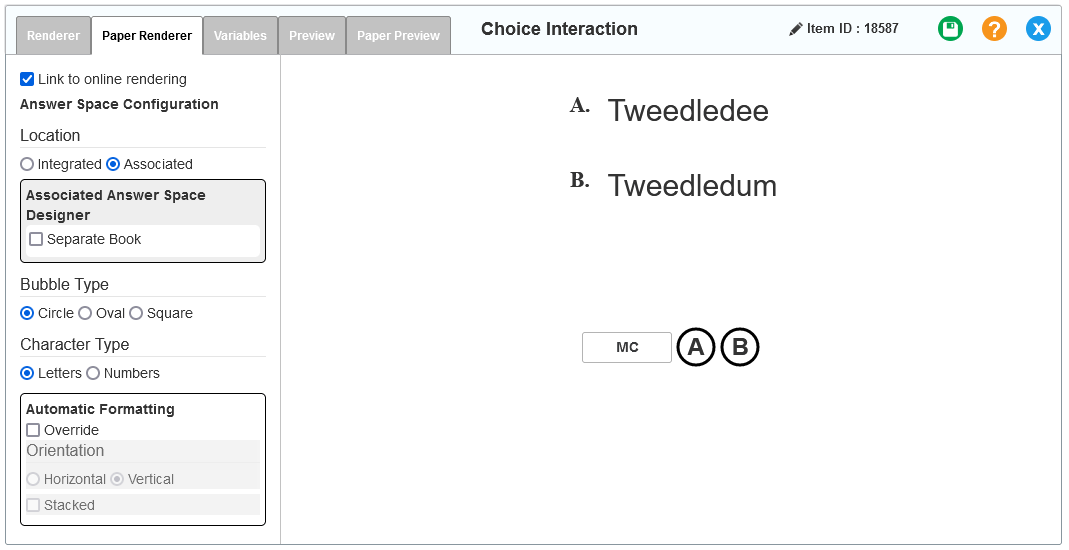
You can configure the answer space for paper-based interactions on the Paper Renderer tab of the interaction editor (Figure 254). This tab only appears after you select Paper Content from the IAT homepage.
Like the Renderer tab, the Paper Renderer tab consists of a Configuration panel on the left and a Design panel on the right.
Figure 254: Choice Interaction Editor Window: Multiple Choice: Paper Renderer Tab
If you make changes to an interaction from the Renderer tab, those changes are automatically applied to the paper-based interaction in the Paper Renderer tab as long as the Link to online rendering checkbox in the latter tab is checked. After clearing that checkbox, you can make changes to the content of the paper version exclusively. For example, if the online version uses the phrase "Click on", you can change the paper version to "Fill in", or you can make a set of Multiple Choice options bolded in the paper version. However, the online version's basic structural characteristics always carry over the paper version.
Some settings are only available for specific interaction types. For more information about how to configure each paper-based interaction type, refer to Rendering Each Type of Paper-Based Interaction.
When you're configuring a paper-based interaction’s answer space, the following settings may appear in the Configuration panel:
- Location: Determines where the answer bubbles appear. You can choose between the following options:
- Integrated: The answer bubbles appear within the interaction content. The exact placement of the bubbles depends on the interaction type.
- Associated: The answer bubbles appear in a separate space below the interaction. If you select this radio button, the Associated Answer Space Designer panel appears, displaying additional settings:
- Separate Book: If you select this checkbox, the answer bubbles will appear on a separate test booklet that students use for responding to questions.
- Type:
- Based On Interaction: The answer space displays a single set of answer bubbles, based on the design of the interaction (as in Figure 255).
- Table: The answer space displays a row for each set of answer bubbles students must fill in. For example, if an Edit Task with Choice interaction requires students to edit two different text elements, the table layout displays separate rows of answer bubbles for each text element (as in Figure 256).
- Wrap answer groups: If you select this checkbox, the groups of answers will wrap rather than being in a line.
- Horizontal
- Vertical
Figure 255: Associated: Type: Based On Interaction

Figure 256: Associated: Type: Table

- Bubble Type: Determines the appearance of the answer bubbles. You can choose from the following options:
- Circle:

- Oval:

- Square:

- Circle:
- Character Type: Determines what type of characters appear in the answer bubbles. You can choose either Letters or Numbers.
-
Automatic Formatting: Determines how the answers themselves are oriented. You can choose either Horizontal or Vertical. You can also choose Stacked, in which case you must enter the number of stacked columns you want
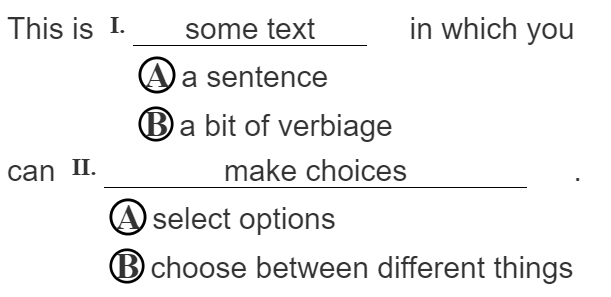
- Series Type: Determines how the answer bubbles are labeled when the interaction has multiple sets of answer bubbles. You can choose from the following options:
- Continuous: Each set continues from where the last set left off (as in Figure 257).
- Group: Each set restarts the numbering (as in Figure 258).
Figure 257: Series Type: Continuous
Figure 258: Series Type: Group

- Inline Orientation: Determines how the answers themselves are oriented. You can choose Horizontal, Vertical, or Detached, depending how you've set up the interaction.
- Interaction Labels: Determines how the answer spaces are labeled. You can choose None, Roman Numeral (as in Figure 259), Uppercase, Lowercase, or Number.
Figure 259: Edit Task with Choice: Interaction Labels: Uppercase
Using MarkAll to Allow Multiple Answer Selections
Sometimes when you're creating a paper-based interaction with bubble options, you may want to allow the machine scoring system to recognize multiple student selections even though the interaction allows only one.
For example, a paper part in an Edit Task Inline Choice interaction allows only one selection, but may have multiple keys (correct selections). In the Paper Renderer tab, you can click the MC (which means single selection) button and select the Force MarkAll checkbox, so that when a student selects multiple keys in a paper test, the machine scoring system will accept that answer as correct. If you do not select Force MarkAll, the machine scoring system will consider this as a single-response paper part and will not score the answer.
You can select Force MarkAll in Edit Task with Choice, Edit Task Inline Choice, External Copy, Selectable Hot Text, Drag-from-Palette Hot Text, and Custom Hot Text (edit only) interactions. When one of those interactions appears in an Interaction Group, Force MarkAll is available there too. When an interaction either is MarkAll only or does not support forcing MarkAll, the button is disabled.
1.Click the MC button (which means single selection) to the left of a set of options in the Design panel. A pop-up opens, as shown in Figure 260.
Figure 260: Edit Task Interaction Editor Window: Edit Task Inline Choice: Paper Renderer Tab with MC Pop-Up
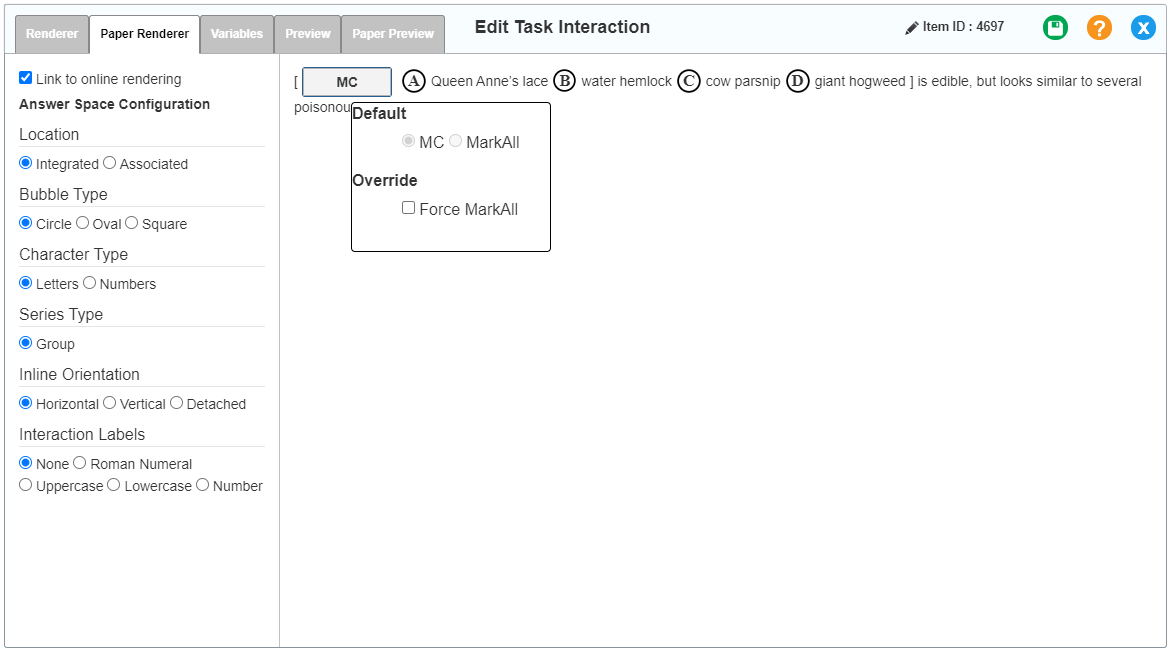
2.Under the Override section of the pop-up, select the Force MarkAll checkbox. The MC button changes to read MarkAll Override.
3.Optional: To change the paper parts back to MC (single selection), clear the checkbox.
4.Optional: Repeat for each paper part in the interaction.
When the Force MarkAll option is in use, a "Paper Scanner Override" message appears on the interaction.