Creating a Script
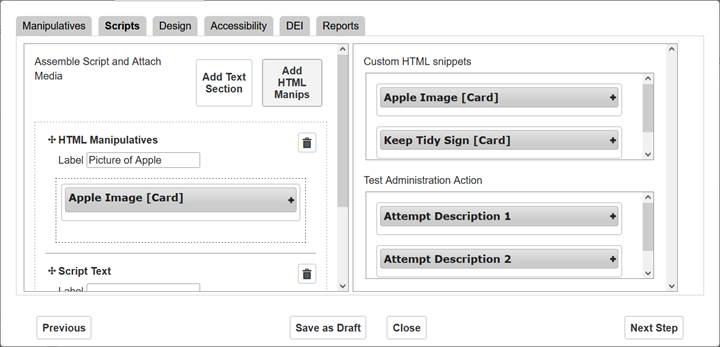
You can create a script in the Scripts tab (Figure 276). The snippets you added in the Manipulatives tab appear on the right.
Figure 276: Alternate Assessment Document Editor Window: Scripts Tab
1.In the Assemble Script and Attach Media panel on the left, do one or more of the following.
-
If you applied a preset template, edit any preset text section elements that appear by following the steps below.
i.Optional: Enter a label in the Label field. This label may appear in the TA’s testing booklet.
ii.Edit the unhighlighted text in the CKEditor. For help using the CKEditor, refer to Appendix A. Note that you need not apply any additional styling to the text; the template has already applied the styling.
iii.To edit any black-highlighted text inserted as part of the preset template, double-click it. In the Configure question placeholder window that appears (Figure 277), edit the label, select either Current or Following from the Question dropdown list, and select a suffix if necessary.
Figure 277: Configure Question Placeholder Window
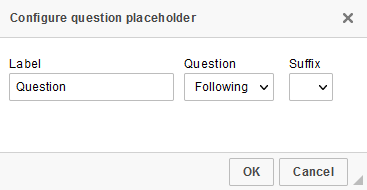
For example, you may want the TA to show the student both a passage of text and an illustration. You could refer to those two things as “Stimulus [Current]a” and “Stimulus [Current]b” and later say, “Proceed to Question [Following]”. When the script is printed, the Current and Following insertions will appear as the numbers of the current and following items.
Avoid deleting the black-highlighted text. You can undo if you delete.
-
To add a section of text to the script, follow the steps below. A text section is the most commonly used script element.
i.Click Add Text Section. A text section element appears.
ii.Optional: Enter a label in the Label field. This label may appear in the TA’s testing booklet.
iii. Enter the text in the CKEditor. For help using the CKEditor, refer to Appendix A.
iv.Select portions of the text and, using the Styles dropdown list, style them Alt script spoken when you want the TA to read them aloud and Alt script action when the text is intended as instructions to the TA. Avoid using other styles. Note that depending on the client, the styles may appear differently in printouts and in the editor.
-
To add HTML manipulatives to the script, follow the steps below. Note that you cannot add resource manipulatives.
i.Click Add HTML Manips. An HTML manipulative element appears.
ii.Optional: Enter a label in the Label field. This label may appear in the TA’s testing booklet.
iii.Drag HTML manipulatives (created in the Manipulatives tab) from the Custom HTML Snippets section into the manipulative element. You can show and hide the content of each manipulative by clicking  and
and  . You may add a manipulative more than once to the same element.
iv.Optional: To remove a manipulative from an element, drag it outside of the box with the dotted line.
v.Optional: To reorder manipulatives within the element, drag and drop them. Be careful not to drag a manipulative outside the border of the box, or it will be removed.
Repeat and edit as necessary.
2.Optional: To remove a section of text or a manipulative from the script, click the delete button  at the top-right corner of the element.
3.Optional: Reorder the elements of the script using the drag-and-drop handles  . This sets the order in which they appear in the testing booklet.
4.To save your changes, click Save as Draft at the bottom of the window. Click OK in the confirmation pop-up.