Creating Manipulatives
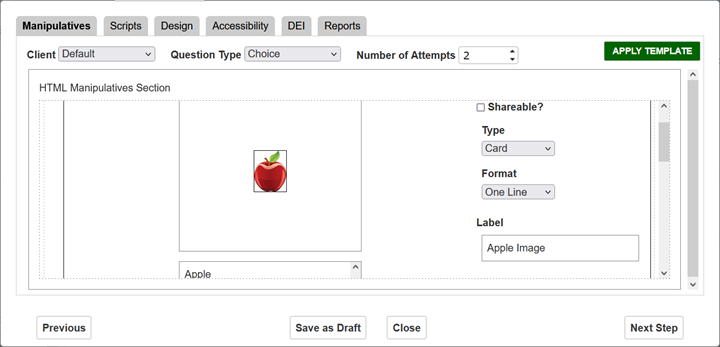
You can create manipulative content in the Manipulatives tab (Figure 275). (Note that if you applied a preset template, you can skip to step 4.)
Figure 275: Alternate Assessment Document Editor Window: Manipulatives Tab
1.Optional: If necessary, at the upper-left corner of the tab, select a client from the Client dropdown list. This setting determines what kinds of layouts and styles will be used when printing content.
2.To the right of the Client dropdown list, select a type from the Question Type dropdown list:
Choice works the same way as a standard Choice interaction. This is the most commonly used type.
Custom is for other kinds of items, such as ones in which the student is asked to match manipulatives or place manipulatives in a certain order.
Writing is for items in which the student is asked to write something, typically guided essays.
3. To the right of the Question Type dropdown list, enter a number in the Number of Attempts field or use the up-and-down arrows on the right to adjust the number. This number is typically 1 or 2. Setting the number to 2 makes the item work like a Scaffolding interaction.
4.In the HTML Manipulatives Section, create manipulatives as follows:
a.Hover over the section and click the rectangle with the dotted line. A manipulative editing box appears.
b.Select the type of manipulative from the Type dropdown list. Then select the format of the manipulative from the Format dropdown list.
Card: A small rectangle of paper, typically printed in a 3×3 format. This is one of the more common types. These are the formats available to this manipulative type:
Text allows you to enter text in a CKEditor (do not enter raw HTML). For help using the CKEditor, refer to Appendix A.
Image allows you to insert an image. To insert an image, double-click the manipulative. The Image Properties window appears. Follow steps 2–5 in the section Inserting an Image.
One Line divides the manipulative into two parts, so that you can insert an image in the top part and a single line of text in the bottom part.
Two Lines is the same as One Line except that it requires a smaller image and allows two lines of text in the bottom part.
Strip: A narrow strip of paper. These are the formats available to this manipulative type:
Text and Image: Same as the formats available for Card.
Left divides the manipulative into two parts, so that you can insert an image on the left and text on the right.
Stacked divides the manipulative into two parts, so that you can insert an image in the top part and text in the bottom part.
Poster: Sometimes called a large card. A large piece of paper. Posters are commonly used for stimuli. These are the formats available to this manipulative type:
Text and Image: Same as the formats available for Card.
Stacked Image Top divides the manipulative into two parts, so that you can insert an image in the top part and text in the bottom part.
Stacked Image Bottom divides the manipulative into two parts, so that you can insert text in the top part and an image in the bottom part.
Resource: A physical object other than a piece of paper. For example, the TA who delivers a Choice item may offer the student a choice between a tennis ball, a baseball, and a golf ball, each of which is a resource. Typically, a resource manipulative represents the object with text (Text format) or an image (Image format). These are the same as the formats available for Card.
c.Optional: To share a manipulative across items that are associated with the same stimulus, select the Shareable? checkbox. This is important if you have a passage that you want to appear only once in the TA’s testing booklet. If you create a manipulative a second time for a second item, it may appear in the booklet twice.
d.Enter a label in the Label field. This label will identify the manipulative at later stages in the item creation process, and may also be useful when an item writer, instead of inserting an image, needs to let the Graphics team know what image to insert. Depending on the client, the label may also appear in printed materials.
e.Enter a description in the Description field. This description will appear in the teacher’s testing booklet and in Response Entry. For help using the CKEditor, refer to Appendix A.
f.Repeat these steps to add more manipulatives and edit existing manipulatives as needed.
5.To save your changes, click Save as Draft at the bottom of the window. Click OK in the confirmation pop-up.
You can delete a manipulative by hovering over it and clicking the  button that appears in the upper-right corner.
Note that the order of the manipulatives in the two sections has no effect on the alternate assessment document. However, for convenience, you can reorder manipulatives using the drag-and-drop handles  that appear when you hover over.